How To Create Retargeting Ads On Facebook

In this post, we’re going to show you how to create a Facebook retargeting ad to retarget the traffic that you're generating from your top-of-funnel Facebook advertising that's not converting.
What do we mean by not converting?
They're either watching your videos and they're not opting in, or your ads are driving website visitors but they're not giving you their property information.
But before we jump into the step-by-step process, Josh created a video over on our YouTube channel that walks you through this entire setup:
Did you know we’ve got an entire YouTube Series dedicated to Facebook Ads for Real Estate Investors? You can check out the entire playlist here.
What You’ll Need For Facebook Retargeting Campaigns
The first thing you’ll need is a Facebook Pixel.
You’ll need to create a custom audience made up of all of the people that have viewed one of your videos.
And then you’ll need to create an ad to show to those people.
If you haven't downloaded it already, we provide all of the Facebook ad copy and video scripts that you need in our proven Facebook Ad Template that you can grab right here absolutely free.
How To Create Retargeting Ads On Facebook
Once you're inside the Facebook ads manager, there are a couple of things you need to do before you can create your dynamic ads for retargeting.
You’re going to need to create a Pixel and put it on your website.
A pixel in Facebook terminology is basically a little snippet of code that you put on your website that tells Facebook whether or not somebody has visited your site.
In our last blog post, we showed you how to create a video views ad on Facebook. And in this article, we’re going to show you how to create a custom audience based on who has viewed that video.
And why are you doing this?
Simple: It’s an easy and very inexpensive way of following up with people who have expressed some sort of interest in selling you their house and continue to build that know/like/trust factor.
The first step of this process is creating your Facebook Pixel. We’re not going to go into how to do that in this article, but it's a very simple process Facebook outlines for you right here.
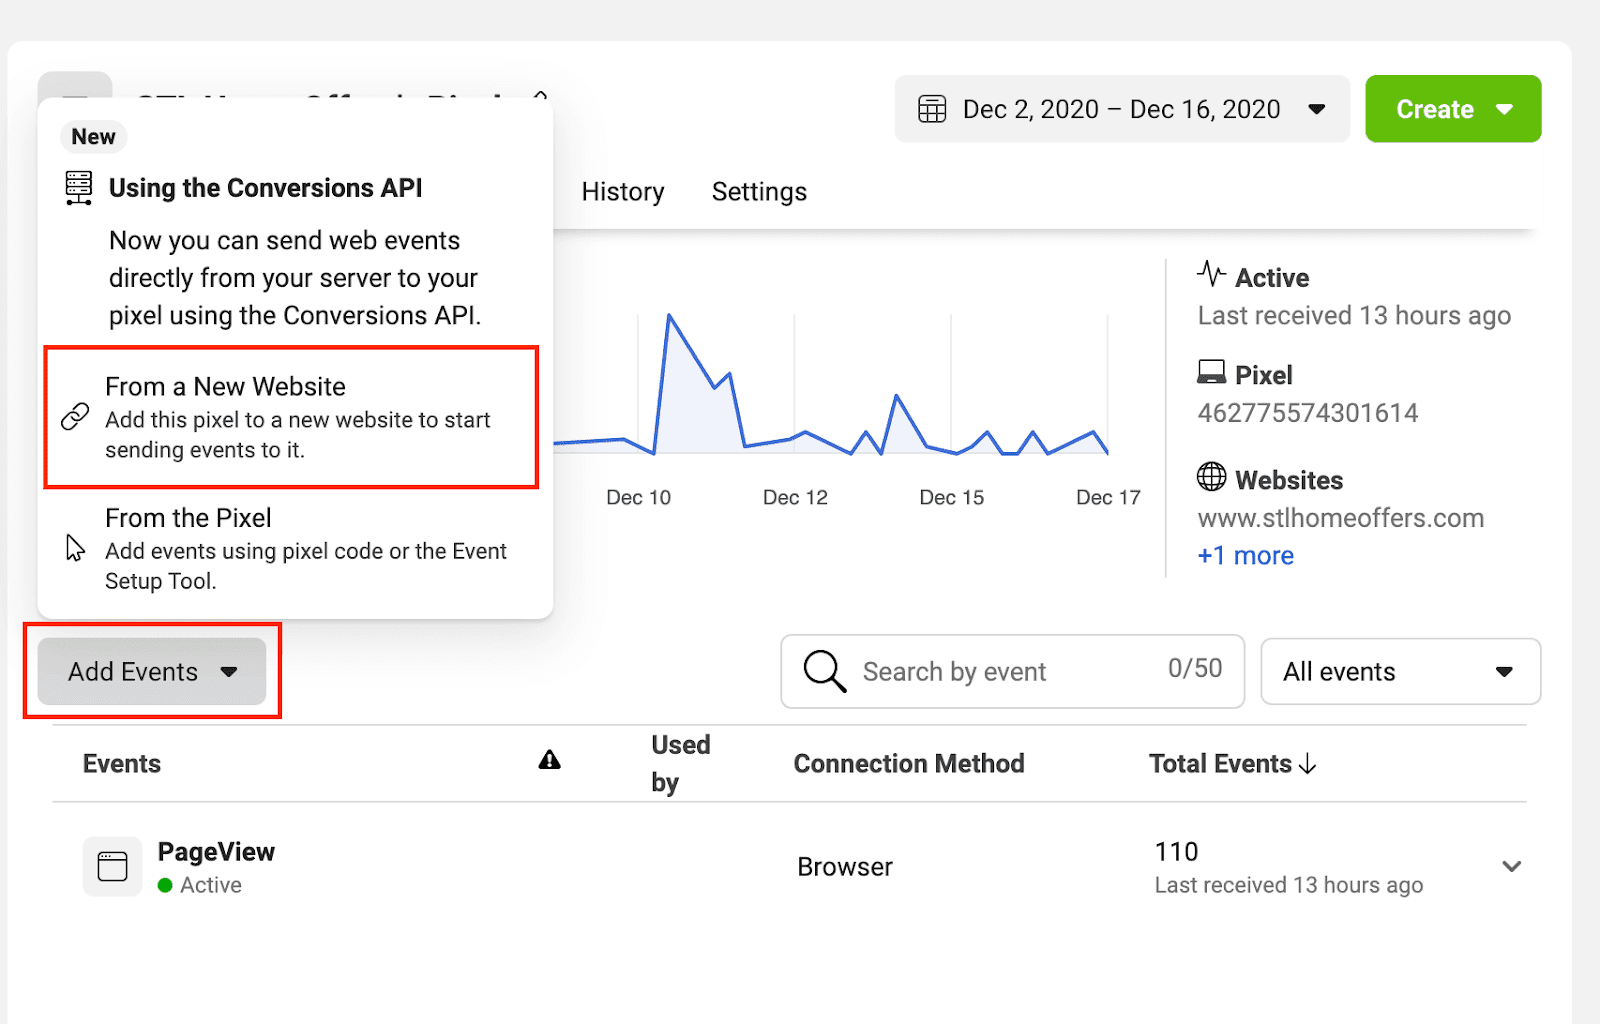
Once you have your Pixel set up, you're going to want to head to Events Manager inside of your Facebook Ads Manager account.
To get your pixel code snippet, Go to: Business Tools>Events Manager and click on “Add Events”, and we're going to click on “From a New Website”, and you want to select “Manually Add Pixel Code to Website”, then simply click “Copy Code”.
If you’re an REI Blackbook user, you’re going to jump inside of the control panel of your website and click on “Tracking Codes” and paste the pixel code there.
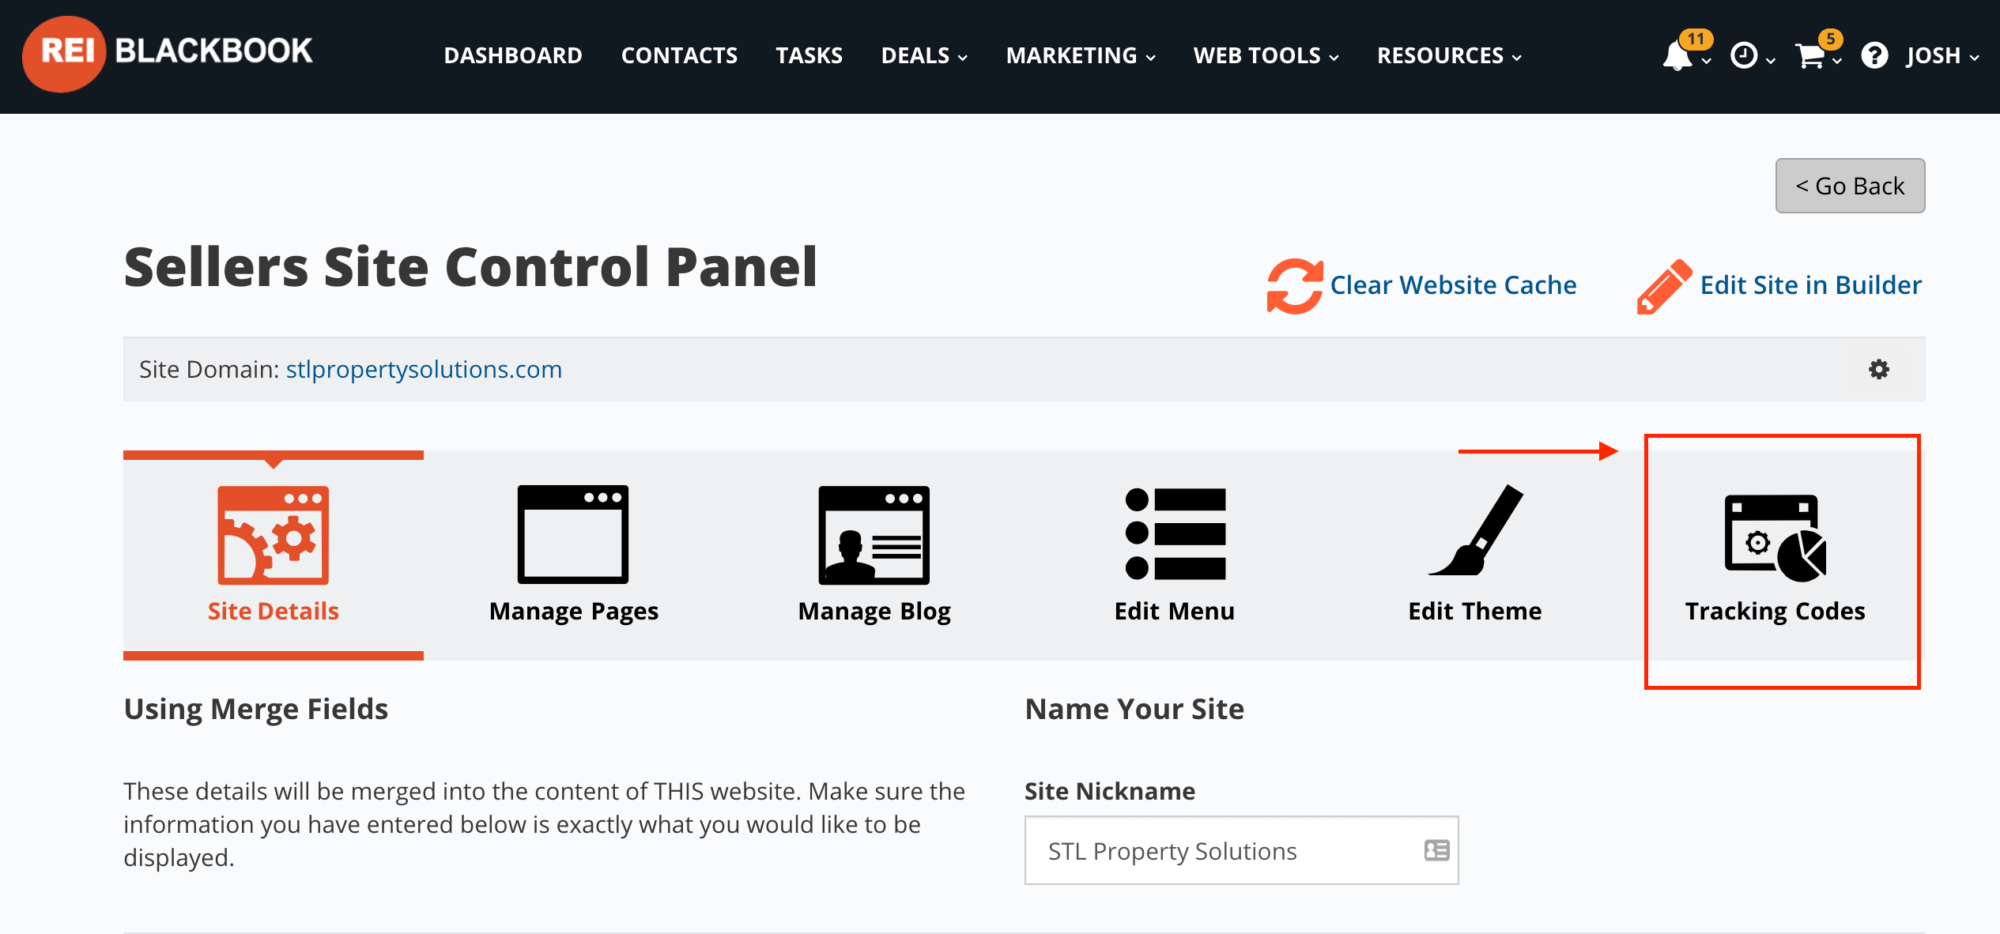
(Note: This is also where you would post your Google Analytics tracking code or any other tracking scripts for that matter.)
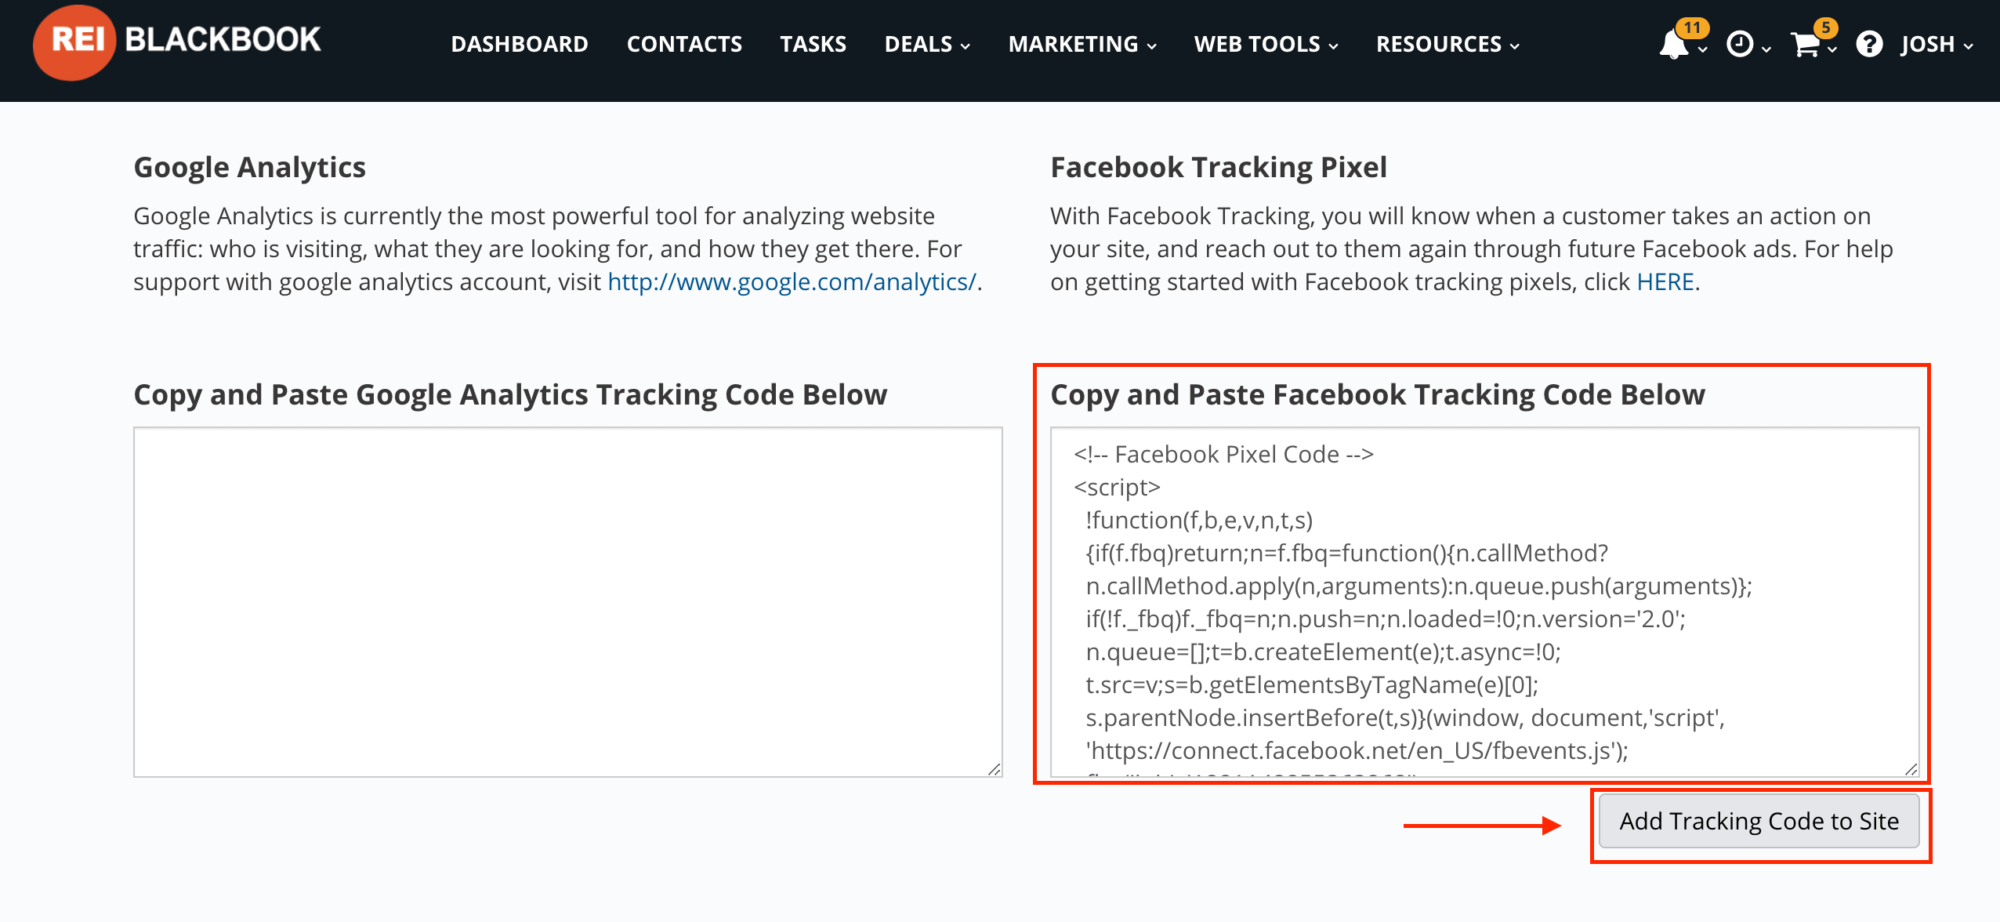
And then you just hit “Add Tracking Code to Site”.
How to Check That Your Pixel Code Is Installed Properly
If you're using Google Chrome, there's a very helpful Chrome extension called the Facebook Pixel Helper. When you’ve installed the code properly, a small number will display on the icon for the extension in your Chrome toolbar.
When you click it, a window will open up that shows you more details like the Pixel ID and the types of conversions it’s tracking. (Examples of conversion tracking include: when somebody converts to a lead, makes a purchase, etc.)
How To Create A Custom Audience
The next thing you’re going to want to do is create a custom audience.
According to Facebook, a custom audience is “an ad targeting option that lets you find your existing audiences among people who are on Facebook”. This includes using sources like traffic to your website, existing customer lists, engagement with your content on Facebook like video views and lots of other possibilities.
From the Facebook Ads Manager, select “Business Tools” and scroll down to click on “Audiences”.
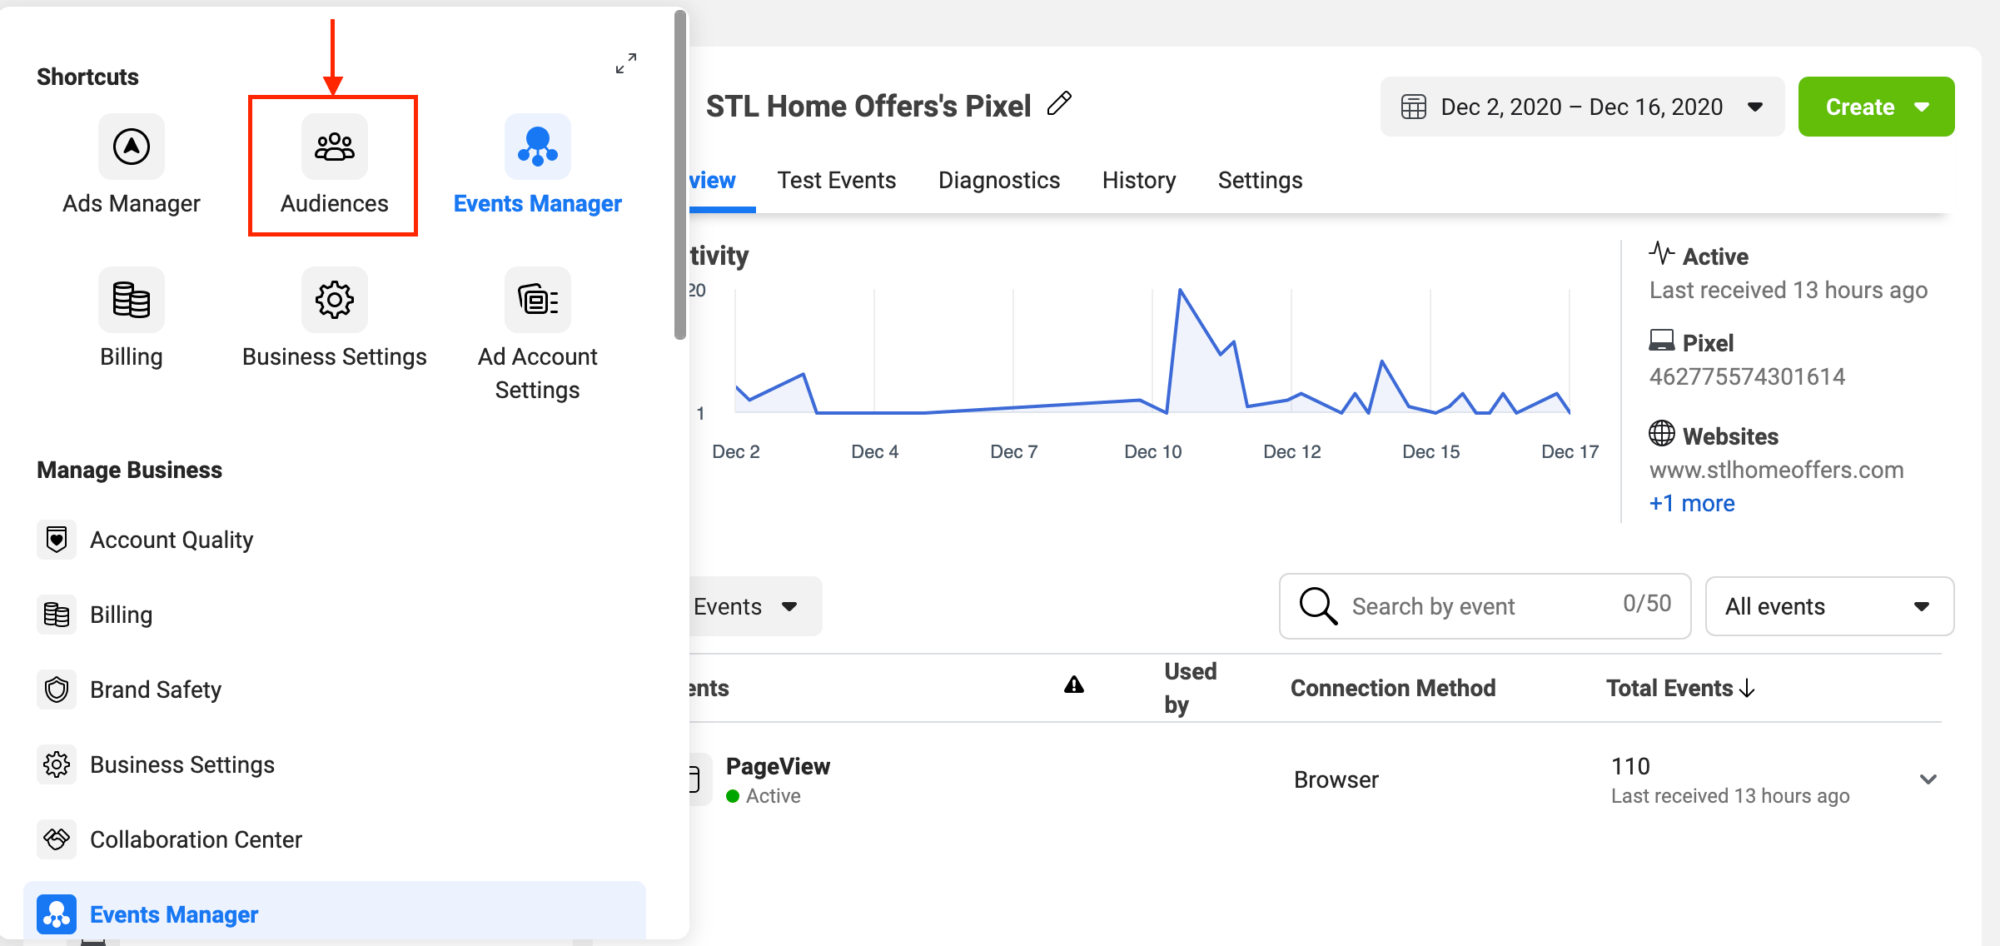
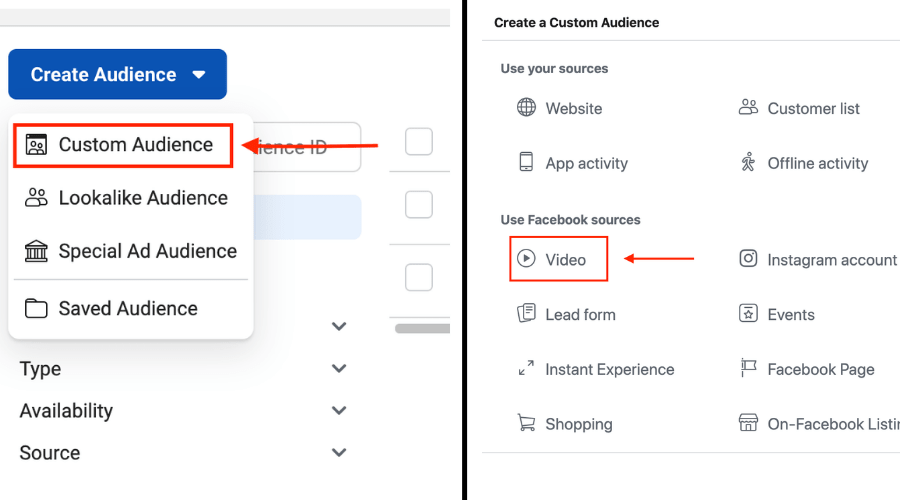
Once the page loads, click “Create Audience” and select “Custom Audience” from the dropdown menu.
There are a bunch of different ways that you can create a custom audience. For our purposes right now, we’re going to select “Video” under “Facebook Sources”.
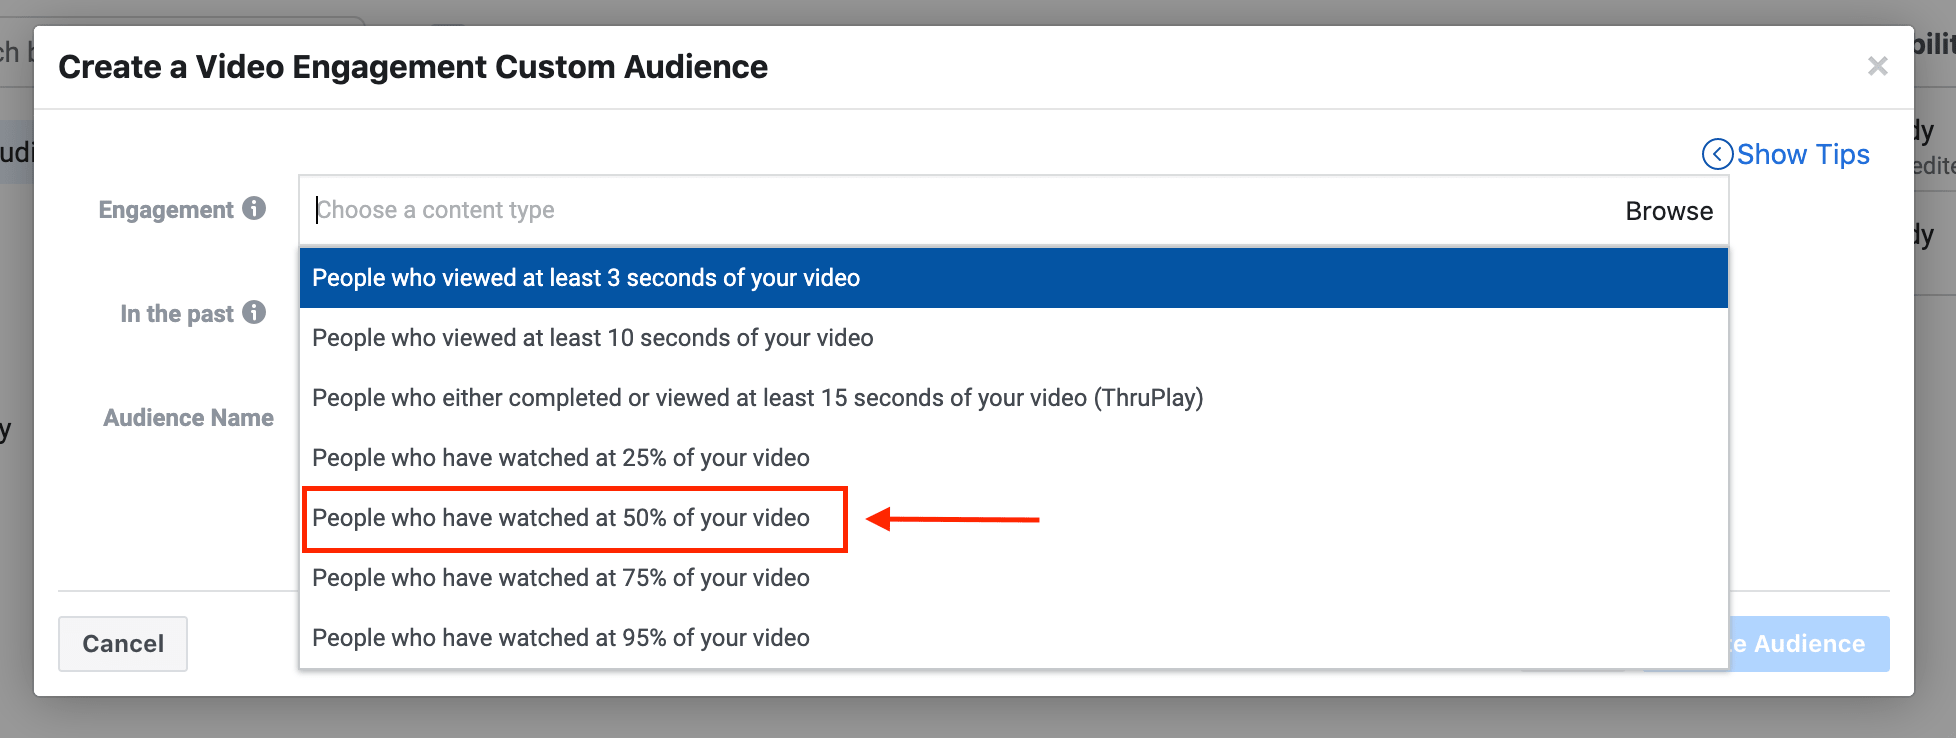
Let’s say you want to target people who had a relatively high level of engagement, so you choose “people who have watched at 50% of your video”.
Select which video (or videos) you want Facebook to use to build your audience. Once you’ve selected the video(s) you want to click “Confirm”.
Then enter the number of days that have gone by since a person’s last interaction with your content that you want Facebook to include.
Because custom audiences are dynamically updated, the actual members of the audience will change and the number of people in them will fluctuate day to day. For example, if for “in the past” you entered 45 days, Facebook would only show your ad to people who have interacted with that video you specified within the past 45 days. People will be removed from your audience after the set time period unless they engage with your content again.
One word of advice: you don't want to go too far back because there's definitely a recency factor at play.
If somebody visited your website 9 months ago, they might not be the best lead. However, if somebody watched your video 7 days ago, you’re probably still top of mind for them and they’re probably a pretty good lead.
We used the example of 45 days, and that’s generally a pretty good number.
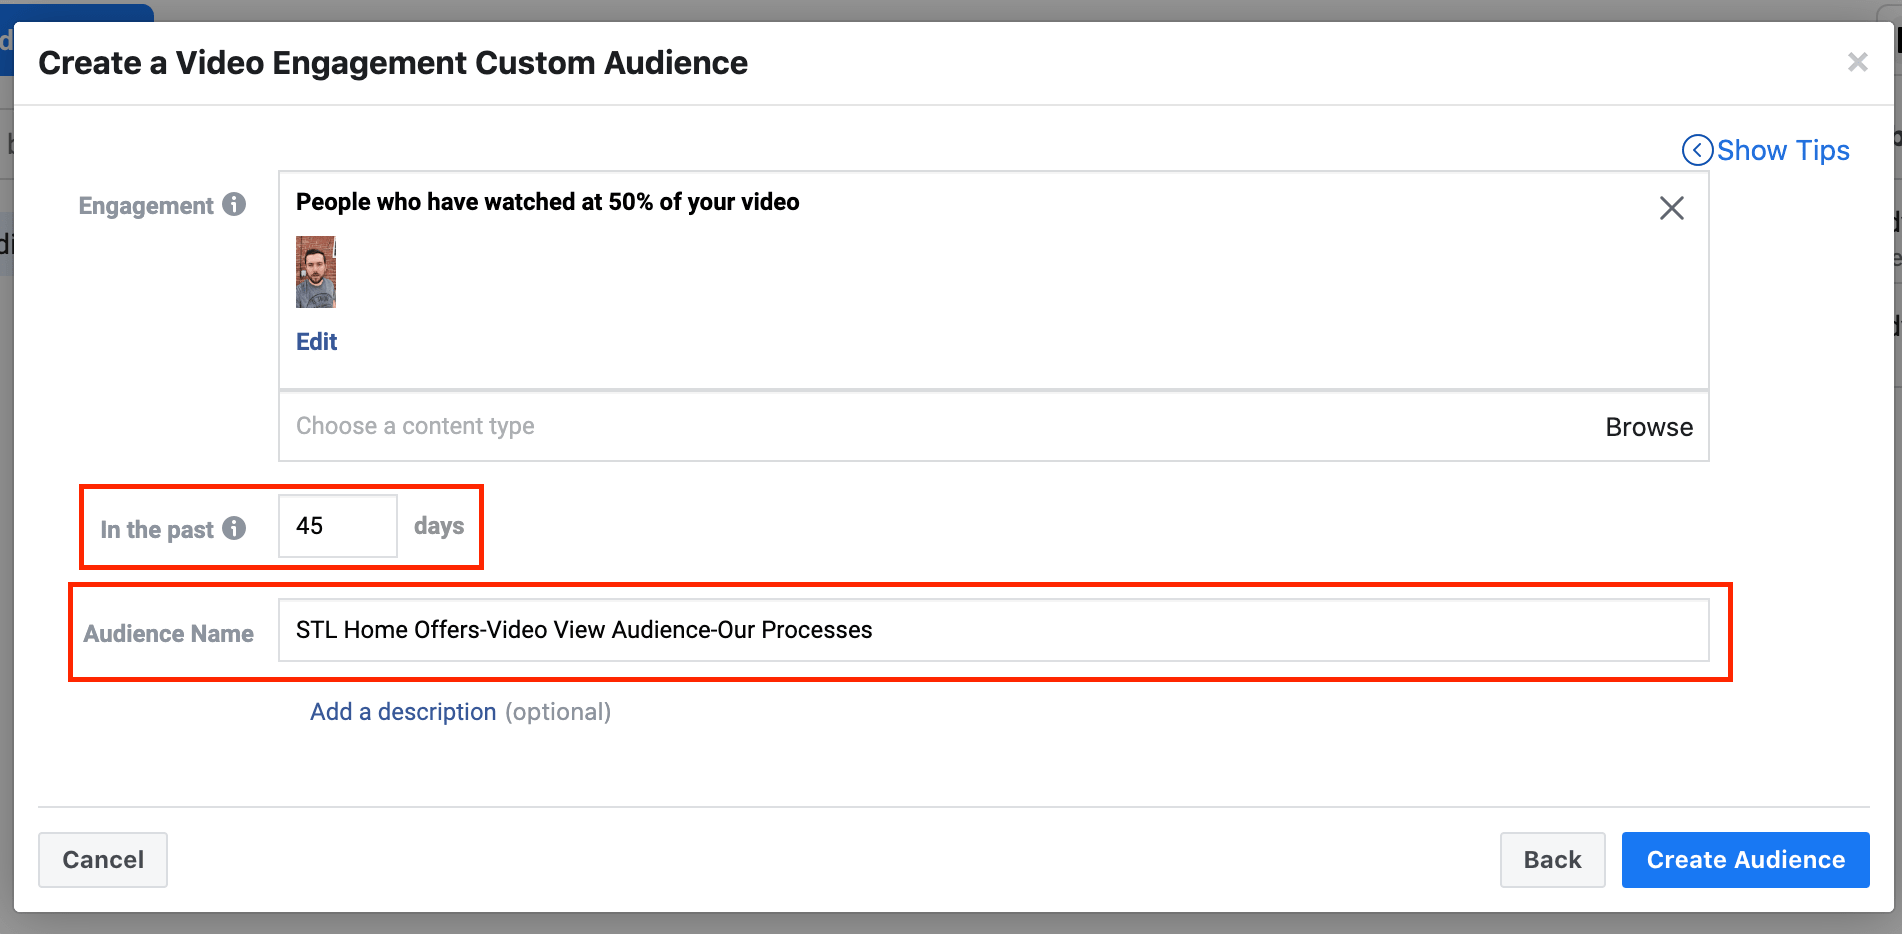
Next, you’ll want to name your custom audience something that will help you easily identify it.
A good rule of thumb is to indicate WHAT defines them In our example (Video Views Audience) and WHAT the piece of content is. (Our Process, is the name of the video in our example.)
So our example becomes: “STL Home Offers-50% VV Audience-Our Processes”
Once you’ve named it, click “Create Audience”.
It generally takes up to 30 minutes for Facebook to create the audience and for it to be ready to use. (They’ll notify you when the audience is ready.)
The great thing about dynamic audiences like this is that over time, they're going to get bigger and bigger because you’re running top-of-funnel Facebook ads to the video you’re basing this audience on. The more people view that video you’ve specified, the more people you’ll be able to retarget.
How to Create Your Retargeting Ad For Your Custom Audience
Once you’ve saved your custom audience, you’ll see a window pop up with the option to “Create an Ad Using The Audience”. Go ahead and select that.
Facebook Ads are set up at three different levels: “campaign”, “ad set” and “ad”. We’re going to take you through the step-by-step setup of each of these.
Setting Up the Campaign Level
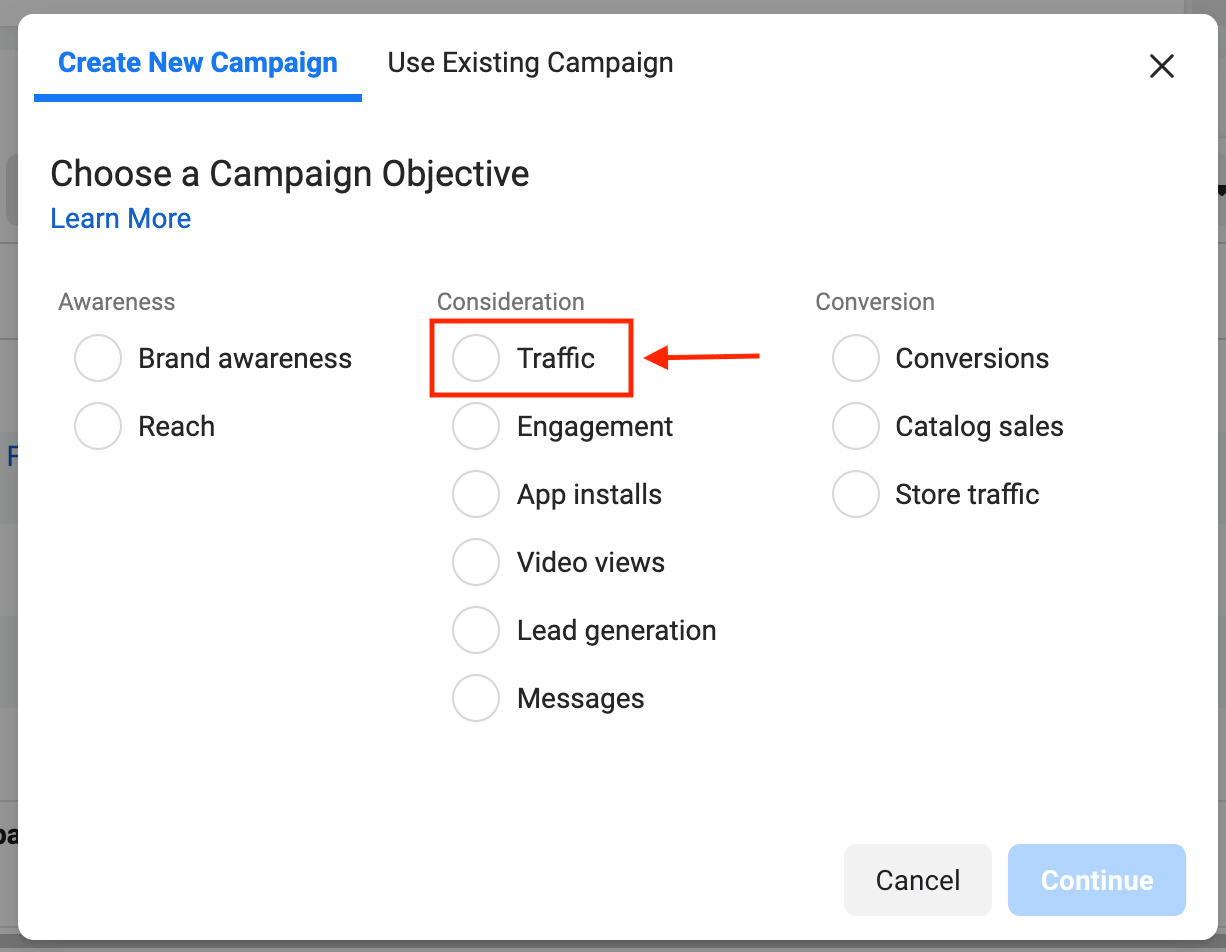
When it comes to the campaign objective, it really depends on what you’re wanting to accomplish.
Let’s say you’re running ads to a page on your website where you want people to opt in to receive an offer on their house. In this case, you have one of two options in the way of objectives: Traffic or Conversion.
With the Traffic option, Facebook is going to use your budget to drive as many people as possible to view the content on the page you are driving them to.
With Conversions, you’d set up what’s called a Custom Conversion in Facebook.
So, let’s say you wanted people to opt in to receive an offer. You could create a custom conversion that tracks all of the people who end up on the thank you page after they opt in and Facebook’s algorithm will learn who the people are that are most likely to complete that objective. Then they’ll funnel more of your budget into getting your ad in front of those people.
Generally, your cost per conversion (CPC) is going to be higher for conversion-optimized campaigns and it will also bring in more qualified leads.
A traffic objective will drive your CPC down, and you’ll get more leads, but they won’t be as highly qualified. So depending on your goal and your budget, you can make that decision about what the best objective for your campaign is.
For this example, we’re wanting to build greater brand awareness in our market (I.E. more eyeballs on our brand), so we’re going to choose “Traffic”, then click “Continue”.
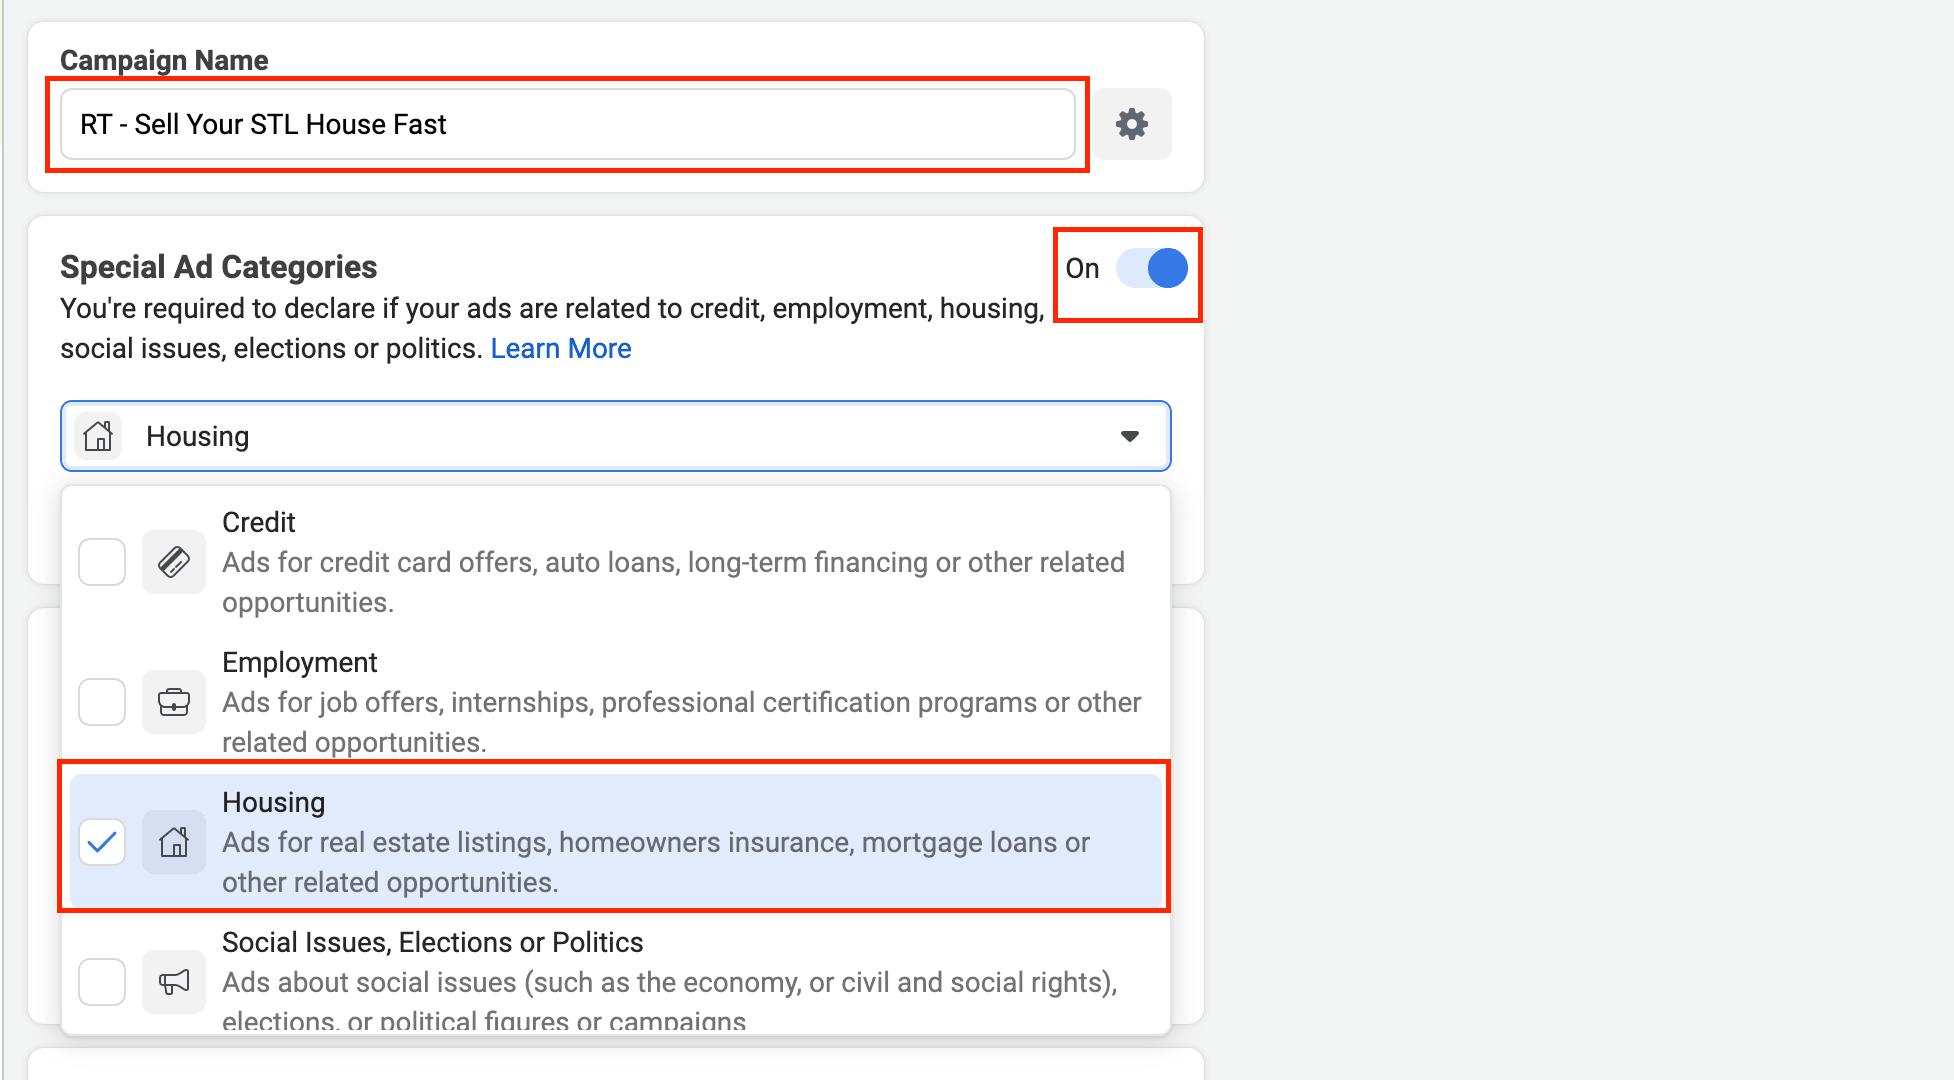
You’ll want to name your Campaign something that will help you easily identify it.
In this example, we’re running a retargeting (RT) ad to “Sell Your STL House Fast”, so we’ll name the campaign:
“RT – Sell Your STL House Fast”
Next, be sure to select “Special Ads Category” as housing/real estate is one of the categories Facebook requires that for.
Once you’ve done all that, scroll down and click “Next”.
Setting Up The Ad Sets Level
At the ad set level, you’ll need to name it as well. I like to use the same name as what I used for the campaign to keep things simple and organized.
Next up, you’ll set your budget. You have two options: Lifetime or Daily.
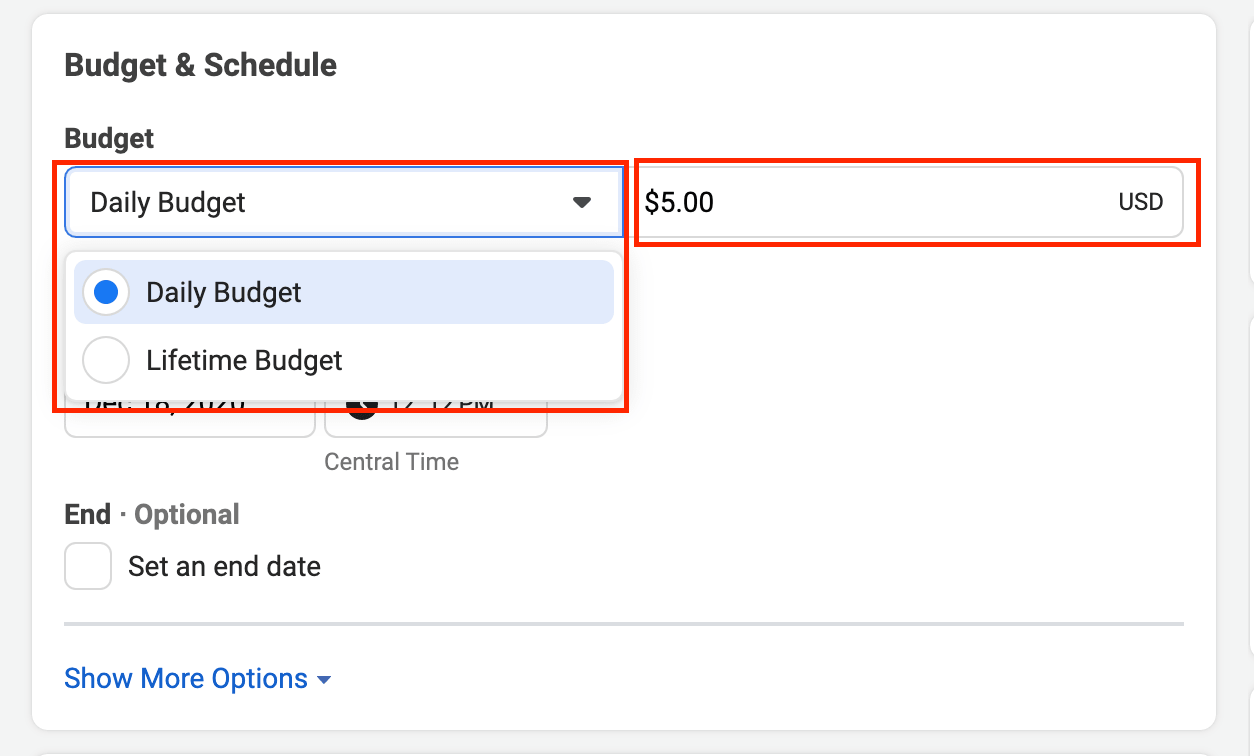
With the lifetime option, Facebook will never spend more than the amount you specify.
With the daily budget option, some days Facebook may spend more or less than your set amount, but it will average out to the daily amount you set.
For retargeting campaigns, you the budget can be pretty small, $3-$5 a day even because conversions generally cost way less when your audience is already “warmed up” from previously interacting with your content.
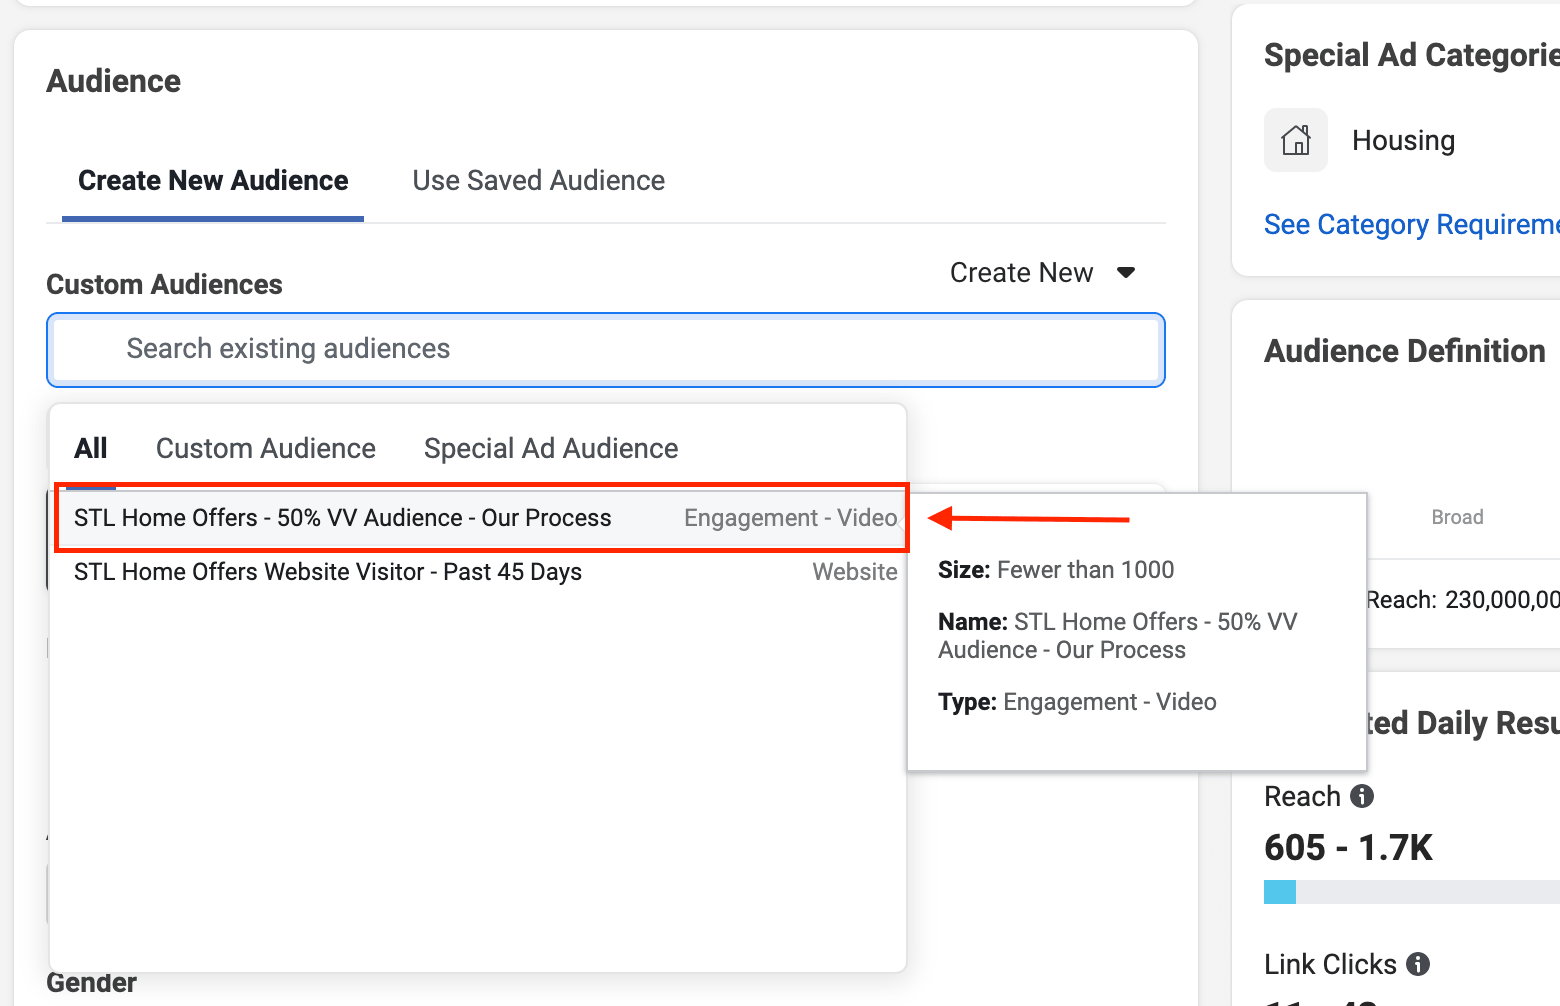
After you’ve set your budget, you’ll select the custom audience you just created from the dropdown menu.
And the last thing you need to do at the ad set level is to choose “Manual” placements.
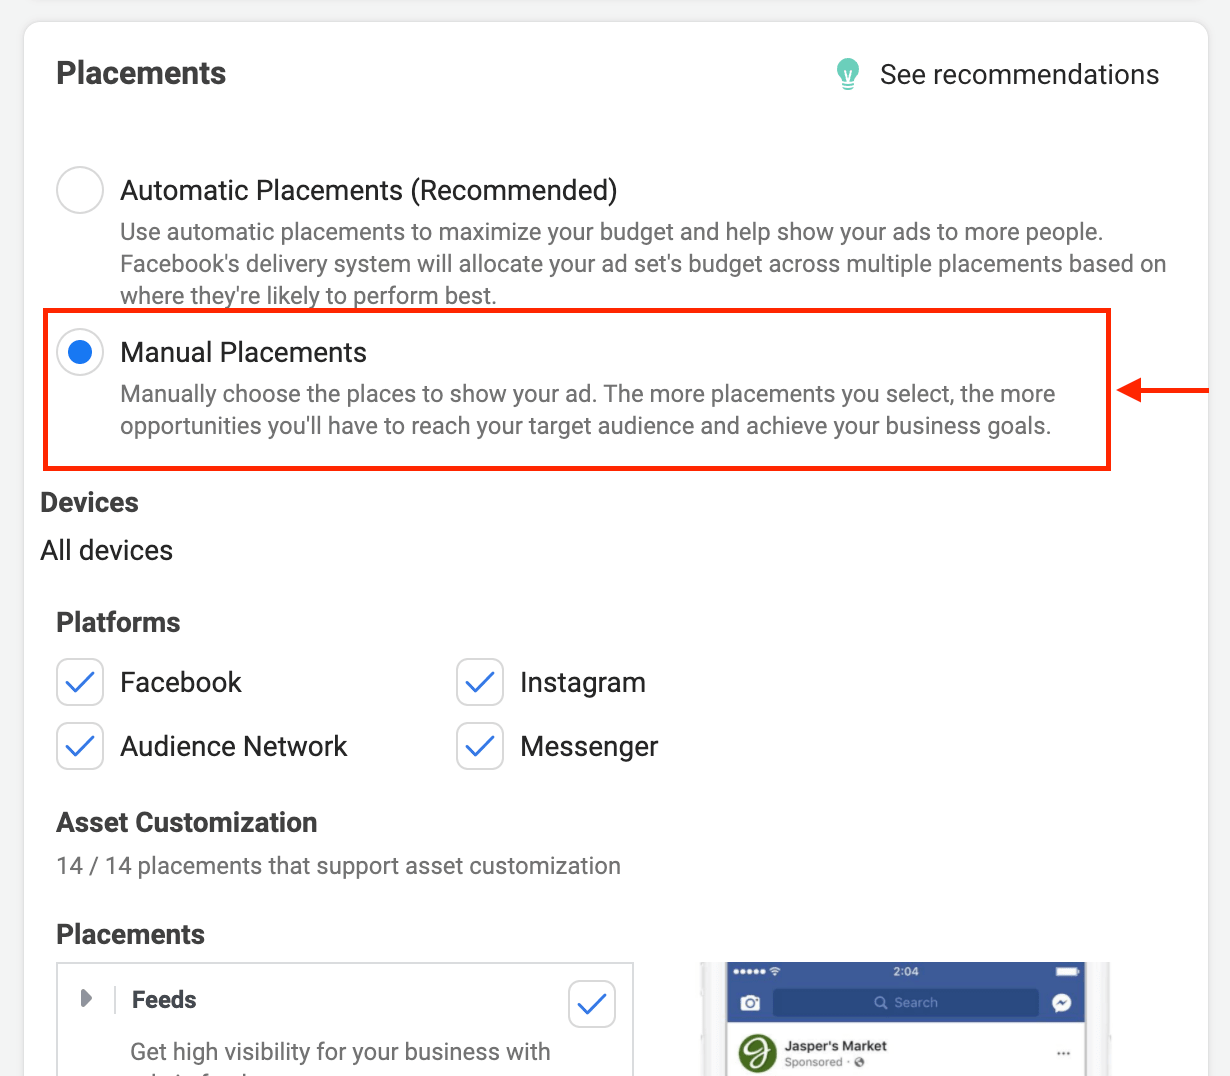
Since you’re running a retargeting ad, (that is, running the ads to people who are already aware of your brand and have interacted with your content,) I’d suggest leaving all of the placements on at first so as to have as broad a reach as possible.
You can start to take some ad placements away as you go, because you'll be able to look at your analytics and you can see where your best results are coming from. You can see which ad placement gives you the most link clicks, which ad placement gives you your most leads etc.
Once you’re done, just click “Next”.
Setting Up The Ad Level
Last but not least is the ad level.
As with the other two steps, the first thing you’ll do here is name your ad. Once again, I’d use the same name as I did for the campaign as well as the ad set for simplicity’s sake.
Now, this is where you need the creative for your ad.
We’ve really simplified this part of the process for you with our proven Facebook Ads Templates and Video Scripts which you can download for free right here. We’ve also got a blog post with a video tutorial that walks you through creating a graphic for your ad using Canva.
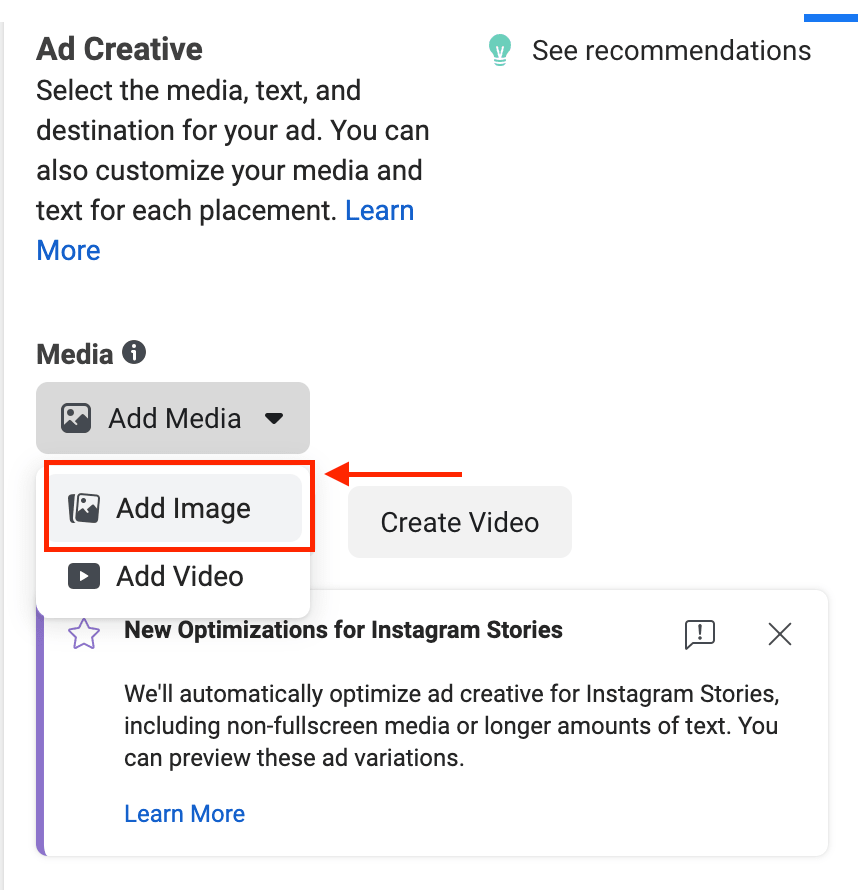
Once you’ve created your image and uploaded it, you’ll be ready to add your Facebook ad copy (Primary Text, Headline and Description). Simply copy and paste to the appropriate boxes from our Facebook Ads Template.
For the Website URL, if you are currently one of our users, you’ll use campaign tracking links which can be found under “Marketing” inside of your REI BlackBook account.
The tracking links are a really powerful tool for several reasons:
Number 1, they’re going to show you how many clicks you're getting, as well as how many leads are actually opting in so you’ll be able to accurately track your conversions.
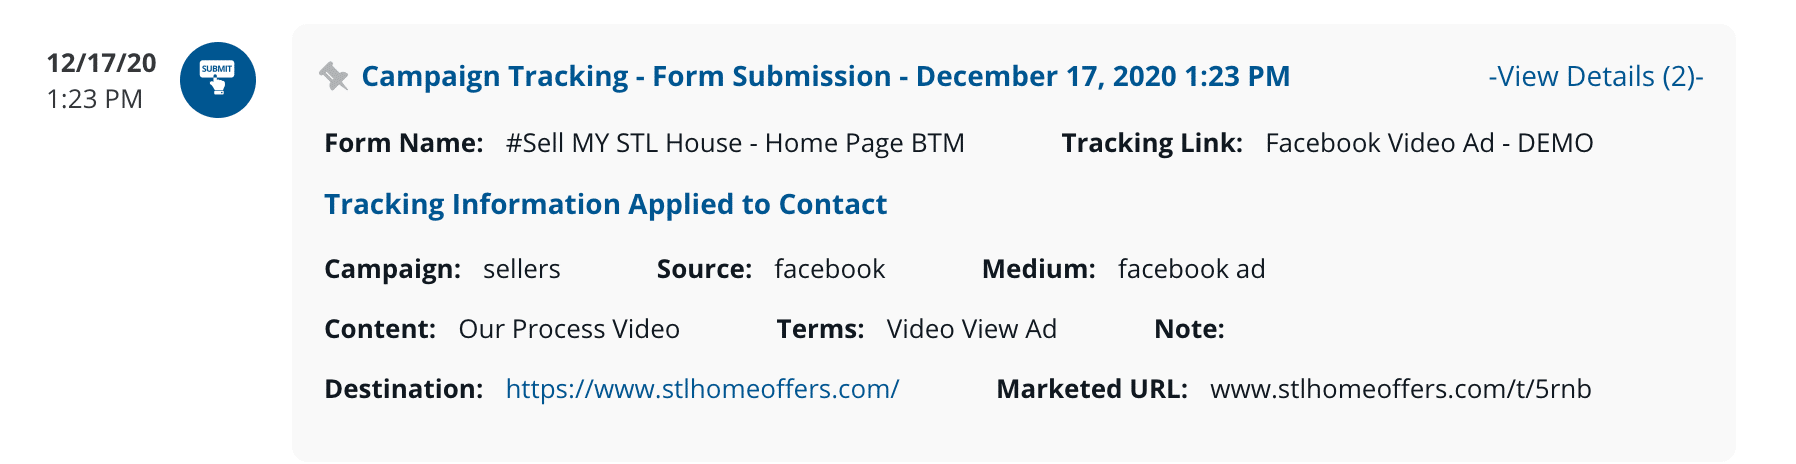
And when you do get a lead, all of the lead’s information automatically comes through inside of the contact record when they submit it.
You'll be able to see details about where the lead came from like: the campaign is for sellers, the source is Facebook, the medium is Facebook ad and the content was “Our Process” video.
If you need help setting your campaign tracking links up, check out this support article.
Once you’ve clicked in to view/edit your campaign tracking link and copied it, paste it into the Website URL form on Facebook Manager.
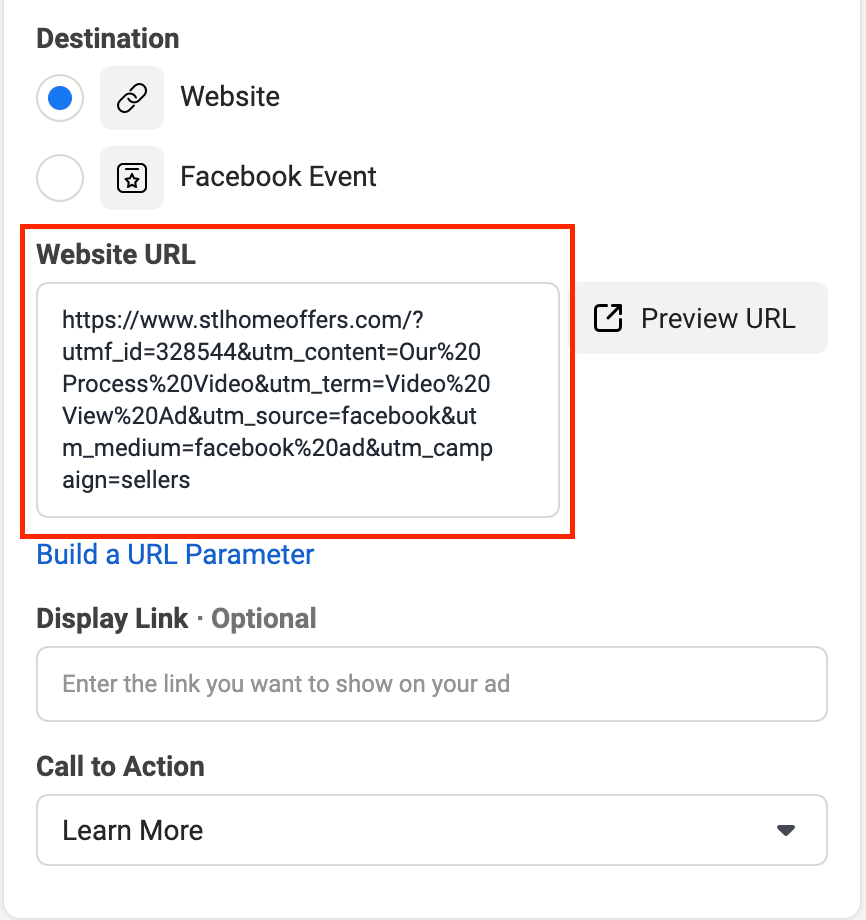
If you’d like, you can customize your display URL, or if you prefer to leave it as is, that’s fine too.
For the call to action (CTA), we’d suggest selecting “Get Offer”, but you’re welcome to test out other options.
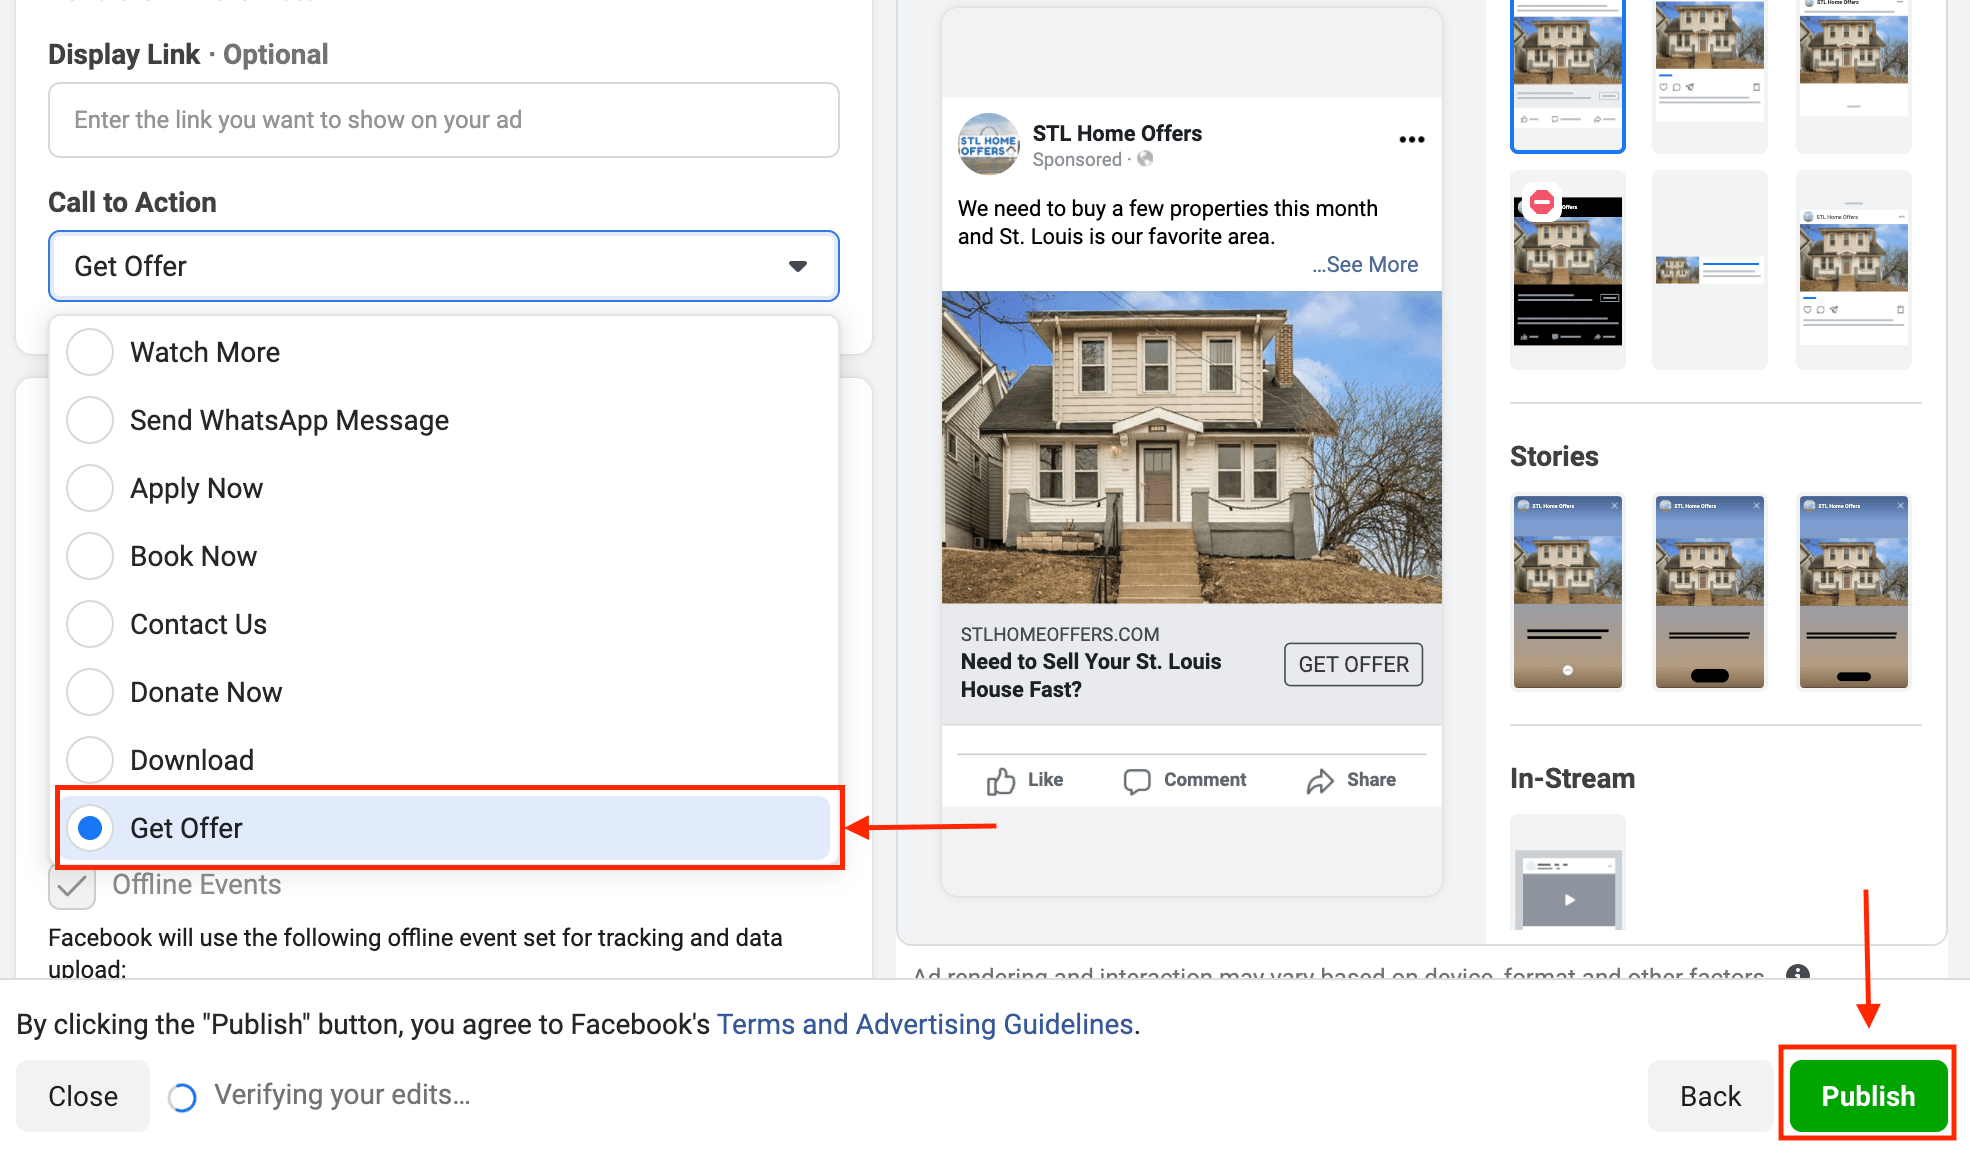
Once you’ve input all of the necessary information, you’ll be able to preview what the ad looks like across all of the different placements, and then all that’s left to do is click “Publish”.
To wrap things up, especially in the real estate investing industry, retargeting is a super powerful and underutilized way to stay in front of your audience, that not enough investors take advantage of. So it's a great way to get an edge over other competitors in your market.
If you're doing any type of marketing at all, to get eyeballs on your brand and clicks to your website, you need to be following up with those people using Facebook ads and social media, because you can literally do it for pennies.
If you’re the kind of person who learns better from watching a video, be sure to check out the tutorial our Marketing Director Josh Arras did on our YouTube channel. And while you’re at it please subscribe and hit the bell icon so you get notified when we drop new videos every Monday.
What You Should Do Now:
- Get started with REI Blackbook for FREE: Get 14 days FREE access to our software and start converting more leads into deals.
- If you'd like to learn the exact strategies our power users are implementing to generate motivated seller leads consistently, check out our Motivated Seller Guide.
- If you'd like to learn how our team can build out your REI Blackbook system FOR you, head to our implementation page.
- If you know another real estate investor who'd enjoy reading this page, share it with them via email, Linkedin, Twitter or Facebook.

Recent Blog Posts


Get Started with REI BlackBook Today
Get started today and get 14 days free access

Without REI BlackBook we would not have gotten as far as we have as fast as we have. It is an invaluable swiss army knife for our business.
Andy Wright
Mountain Shamrock Properties